How to Epoxy a Garage Floor: Step by Step
Epoxying a garage floor takes one day of prep, one day of coating and a few days of cure. This guide covers the whole job for a solid color or full flake floor using the Garage Pro System, which is how most of our customers do it. Metallic floors and one-day polyaspartic floors have their own guides, linked at the end. If you have not picked a kit yet, start with the garage floor epoxy kits.
The short version
- Test the slab for moisture two days ahead.
- Empty, degrease, grind and vacuum the floor. Fill cracks and joints.
- Day one: mix and roll the epoxy base coat. Throw flake into it if you want a flake floor.
- Day two: scrape loose flake, roll the topcoat.
- Walk on it on day three. Park on it on day four to seven.
What you need
| Item | Where it comes from |
|---|---|
| Epoxy kit sized to your floor: base coat, topcoat, flake if you want it | In the Garage Pro System. The epoxy calculator picks the size. |
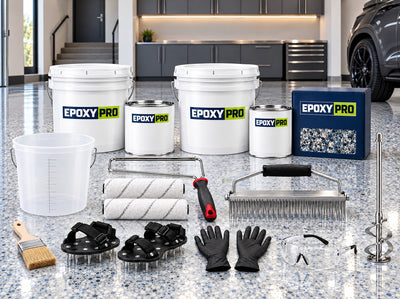
| 18 inch roller frame and two covers, 18 inch notched squeegee, mix wand, chip brush, spiked shoes, mixing bucket, gloves, safety glasses | The tool kit in every Pro kit. Floors of 1,400 sq ft and up get two. |
| Floor grinder with a diamond cup wheel and a vacuum port, plus a hand grinder for the edges | Tool rental, by the day |
| Shop vacuum, drill for the mix wand, degreaser, stiff brush, painter's tape, plastic sheeting | Hardware store |
| Crack filler, spall repair or joint sealant, if the slab needs them | R-818, R-343, R-830 |
| Moisture vapor primer, only if the slab fails the moisture test | P-409 |
How much epoxy a garage floor takes
Measure the floor, length times width in feet. One 3 gal kit of B-707 High Build Epoxy covers 350 sq ft at about 14 mils, which is one car bay. A 2-car garage of 20 by 22 ft is 440 sq ft, so it takes the 2-car kit (up to 700 sq ft). If your floor sits at the top of a size, order the next size up. Rough or porous concrete drinks more.
| Kit size | Covers | Base coat | Flake, full broadcast | Topcoat |
|---|---|---|---|---|
| 1-Car | Up to 350 sq ft | 1 x 3 gal kit | 1 x 40 lb box | One 1.5 gal T-521 kit, or one 2 gal T-444X kit over flake |
| 2-Car | Up to 700 sq ft | 2 x 3 gal kits | 2 x 40 lb boxes | One 3 gal T-521 kit, or two 2 gal T-444X kits |
| 3-Car | Up to 1,050 sq ft | 3 x 3 gal kits | 3 x 40 lb boxes | One 3 gal and one 1.5 gal T-521 kit, or three T-444X kits |
| 4-Car | Up to 1,400 sq ft | 4 x 3 gal kits | 4 x 40 lb boxes | Two 3 gal T-521 kits, or four T-444X kits |
Kits also come in sizes up to 1,750 and 2,100 sq ft. Above that, call us.
Two days before: test for moisture
Tape a 2 ft square of plastic sheeting to the slab and seal all four edges. Leave it 24 hours. If the underside is wet or the concrete under it has darkened, moisture is coming up through the slab. Epoxy put over a damp slab lifts. Roll P-409 Moisture Vapor Primer first; one 1.5 gal kit covers about 140 sq ft. Garages on grade usually pass. Basements and slabs with no vapor barrier often fail. Full details in how to test a concrete floor for moisture.
The day before: prep the concrete
Prep is most of the work and all of the difference. Floors peel because the concrete was smooth, dirty or damp, not because the epoxy failed.
- Empty the garage. Everything out, including shelving along the walls.
- Degrease. Scrub oil spots with degreaser and a stiff brush, rinse, let the floor dry. If a stain darkens again the next day, the oil is in the slab. Mark those spots for P-820 Oil Stop Primer before the base coat.
- Grind. Run the grinder in overlapping passes until the whole floor is an even dull gray that feels like 120-grit sandpaper. Grind off any old paint or sealer completely. Do the edges and corners with the hand grinder. Acid etching is the fallback for bare, never-sealed concrete; it is less reliable and needs a full day to dry afterward. See grinding vs acid etching.
- Repair. Vacuum, then fill cracks with R-818 Epoxy Crack Filler, rebuild chips and spalls with R-343 Concrete Quick Fix, and fill saw-cut control joints with R-830 Flexible Joint Sealant if you want a seamless floor. Scrape or grind the repairs flush. Our crack filler guide walks through it.
- Vacuum twice. Dust is what kills the bond at the end. Do the whole floor, then the edges again. Do not wet-mop; if you must, give it a full day to dry.
- Tape. Run painter's tape along the bottom of the walls, the door tracks and the threshold.
The full prep walkthrough is in how to prep a garage floor for epoxy.
Check the weather
Epoxy needs the slab and the air between 60 and 90°F and humidity under 85%. Close the garage door the night before so the slab settles to a steady temperature. Coat in the morning when the slab is coolest, and keep direct sun off the wet floor. Below 60°F the epoxy cures slowly and stays soft; the cold-weather epoxy goes down to 45°F, and the Garage One-Day System works at 50°F.
Day one: the base coat
Plan the batches
B-707 gives you 30 to 50 minutes of working time per batch at 70°F, less when it is hot. Each 3 gal kit covers one bay. Mix one kit at a time and have the next one open and ready. Two people is the comfortable crew: one pours and squeegees, one back-rolls.
Mix
- Stir Part A on its own first; the pigment settles.
- Pour all of Part B into Part A. The ratio is 2:1 by volume and the kit is packaged in that ratio, so use the whole of each can.
- Mix with the wand on a drill for 3 minutes, scraping the sides and bottom. Do not whip air into it.
- Do not let the mixed epoxy sit in the bucket. It heats up and sets faster in a mass than on the floor. Pour it out right away.
Apply
- Cut in a 2 inch band along the walls with the chip brush, working ahead of the roller.
- Pour the mixed epoxy in a ribbon across the floor, starting at the back wall so you finish at the door.
- Spread it with the notched squeegee to an even coat. The notches meter the thickness.
- Back-roll with the 18 inch roller in one direction, then lightly across, to level the squeegee lines. Put on the spiked shoes before you step into wet epoxy.
- Keep a wet edge. Pour the next batch against the edge of the last one before it starts to set.
Full flake floor: broadcast while the base coat is wet
Work in sections you can reach. Right after you back-roll a section, throw flake up and let it fall onto the wet epoxy, like feeding chickens. For a full broadcast you keep going until the floor will not take any more and the base coat color is gone. That takes about 40 lb for every 350 sq ft. Wear the spiked shoes and throw from the edges inward so you are not standing in the finished area. Flake guide and blends: full flake epoxy floor kits.
Solid color floor
Once the base coat is rolled, you are done for the day. Keep people, pets and dust out of the garage. If the slab is very porous and the first coat soaked in unevenly, a second thin coat of B-707 gives a uniform finish; most ground slabs do not need it.
Day two: the topcoat
Recoat the next day, once the base coat is hard enough that a thumbnail does not mark it. If more than 48 hours pass, lightly sand the base coat and vacuum before you topcoat.
Flake floor: scrape, vacuum, clear coat
- Scrape the whole floor with a flat floor scraper held nearly flat. This knocks off the flakes standing on edge so the clear coat lies smooth.
- Vacuum all the loose flake. Then vacuum again.
- Mix T-444X Polyaspartic 1:1. It gives you 10 to 20 minutes per batch, so mix only what you can roll out, about half a kit at a time for one person.
- Pour a ribbon, spread with the squeegee and back-roll. Keep the coat between 5 and 12 mils wet; thicker than that it can bubble. One 2 gal kit covers one bay over flake.
- If you want extra grip near the door or on a slope, sprinkle anti-slip grit into the wet clear.
Solid color floor: roll the polyurethane
Mix T-521 Water Based Polyurethane and roll it thin, 3 to 5 mils wet, about 320 to 500 sq ft per gallon. It is the wear layer and the UV protection; bare epoxy ambers in sunlight. Do not pour it, roll it from a tray. A matte version, T-520, is in the Basement & Indoor Pro System.
Cure and move back in
- Day 3: foot traffic.
- Day 4 to 7: park on it. Cold garages take the long end.
- First two weeks: no dragging heavy steel across it, no hot tires straight off the highway if you can help it. The coating is still hardening.
Cleaning and upkeep are in how to clean an epoxy floor.
Mistakes that ruin a garage floor epoxy job
- Skipping the grind. Epoxy does not bond to smooth, sealed or painted concrete. This is the number one cause of peeling. See why epoxy floors peel.
- Coating a damp slab. Do the plastic sheet test.
- Mixing a whole batch and walking away. Mixed epoxy in a bucket sets in minutes. Pour it out.
- Short-pouring the mix ratio. Use the whole can of each part. Eyeballing half kits is how you get soft spots.
- Coating in direct sun or over 90°F. The epoxy skins, traps bubbles and sets before you can roll it.
- Topcoating too thick. Polyaspartic and polyurethane are thin coats. Thick coats bubble and stay soft.
- Driving on it on day two. Tires will print.
What it costs to do it yourself
| Floor | Garage Pro, solid color | Garage Pro, full flake |
|---|---|---|
| 1-car, up to 350 sq ft | $584.99 ($1.67 per sq ft) | $904.99 ($2.59 per sq ft) |
| 2-car, up to 700 sq ft | $1,039.99 ($1.49 per sq ft) | $1,694.99 ($2.42 per sq ft) |
| 3-car, up to 1,050 sq ft | $1,509.99 ($1.44 per sq ft) | $2,489.99 ($2.37 per sq ft) |
| 4-car, up to 1,400 sq ft | $2,074.99 ($1.48 per sq ft) | $3,389.99 ($2.42 per sq ft) |
Topcoat and tools are in the price. Add a day of grinder rental, and crack filler or primer if the slab needs them. Orders over $500 ship free. Installers charge $6 to $9 per sq ft for the same floor. The full breakdown is in how much it costs to epoxy a garage floor.
Other finishes
- How to apply metallic epoxy: a black ground coat, then pigmented clear epoxy moved while wet.
- How to install a one-day polyaspartic garage floor: polyurea base and polyaspartic clear, both in one day.
- Basement floor epoxy guide: the same job below grade, where moisture decides everything.
How to epoxy a garage floor FAQ
How long does it take to epoxy a garage floor?
One day of prep, one day for the base coat, a second coating day for the topcoat, then three days before you walk on it and four to seven before you park. Plan on a long weekend plus a week of cure. The One-Day System compresses the coating to one day.
Do I need a primer under garage floor epoxy?
Not on ground or etched concrete that passed the moisture test. B-707 is a high build epoxy that goes straight onto profiled concrete. A damp slab needs P-409 Moisture Vapor Primer; oil-soaked spots need P-820 Oil Stop Primer.
How many coats of epoxy does a garage floor need?
One base coat of 100% solids epoxy at about 14 mils, plus one topcoat. That is the whole Garage Pro floor. Thin water-based or big-box epoxies need two or three coats to reach the same thickness, which is why they are sold that way.
Can I epoxy a garage floor in winter?
Standard epoxy needs 60°F on the slab, not just in the air. If you can heat the garage to 60°F for three days, yes. Otherwise use the cold-weather epoxy, which goes down to 45°F, or the One-Day System at 50°F.
Can I do it alone?
A one-car floor, yes. For two bays and up, bring a helper so one person pours and squeegees while the other back-rolls and broadcasts flake.
What if I run out of epoxy mid-floor?
Stop at a straight line, let it cure, sand the edge lightly and continue the next day. Avoid this by ordering the next size up when your floor is near the top of a range.
Every order includes a free 20-minute call to go over your floor before you start. Call (877) 703-7699. If we miss you, we call back within an hour.