How to Apply Metallic Epoxy to a Floor
A metallic epoxy floor is three layers: a black ground coat, clear epoxy with metallic pigment mixed in, and a clear topcoat. The look comes from how you move the pigmented layer while it is wet. This guide walks through the job with the Garage Pro System in the metallic finish. The same steps apply to the Basement & Indoor Pro kit, which swaps the gloss topcoat for a matte one. Kit sizes and prices are on the metallic epoxy floor kits page.
Before you start: is a metallic floor the right choice?
- It is the most technique-dependent finish we sell. If this is your first floor, a solid color or full flake floor is more forgiving.
- It is glossy and clear, so it shows every low spot, crack and roller mark in the slab. The concrete has to be in good shape.
- Each floor comes out different. You control the color and roughly the pattern. You do not control exactly where the pigment flows.
- It takes two coating days: the ground coat and the metallic coat on day one, the topcoat on day two. Plan on a day of prep before that and three days of cure after.
What is in the kit, per car bay (350 sq ft)
| Layer | Product | Quantity per bay | Goes on at |
|---|---|---|---|
| Ground coat | P-015 Water Based Epoxy Primer, black | One 2 gal kit | A thin, even black coat |
| Metallic coat | C-671 Clear Epoxy with metallic pigment | One 3 gal kit plus one 0.75 gal kit, with 12 oz of pigment | 16 to 18 mils, about 90 to 100 sq ft per gallon |
| Topcoat | T-521 Water Based Polyurethane, gloss (T-520 matte in the basement kit) | One 1.5 gal kit for 1 bay, one 3 gal kit for 2 bays | 3 to 5 mils wet |
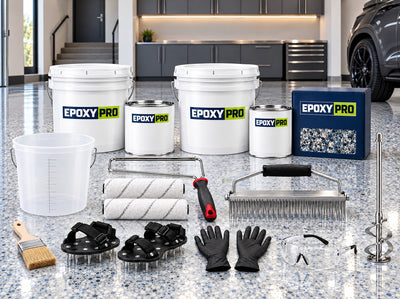
| Tools | 18 inch roller frame and two covers, 18 inch notched squeegee, mix wand, chip brush, spiked shoes, bucket, gloves, safety glasses | One kit; two for floors of 1,400 sq ft and up |
Also bring a drill for the mix wand, a shop vacuum, painter's tape, a few clean 1 gal cups or small buckets for pouring, and a spray bottle if you want to try the cell effect described below. The Starter metallic kit has the same ground coat, clear and pigment with no topcoat, a mix wand and a squeegee.
Prep the slab harder than you would for any other floor
Do everything in how to prep a garage floor for epoxy, with extra care on three points:
- Moisture. Tape a 2 ft square of plastic to the slab for 24 hours. A damp slab needs P-409 Moisture Vapor Primer first, and the black ground coat goes over the P-409. See the moisture test guide.
- Repairs flush. Fill cracks with R-818 Epoxy Crack Filler and chips with R-343 Concrete Quick Fix, then grind the repairs dead flat. A clear coat pools in anything below grade and shows a bump over anything above it.
- Dust. Grind to a 120-grit feel, then vacuum twice. A speck of grit under a glossy clear floor is there forever.
Slab and air between 60 and 90°F, humidity under 85%. Keep the garage door closed and the sun off the floor; a metallic coat that sets unevenly in a sunny patch leaves a visible line.
Day one, morning: the black ground coat
The ground coat does two jobs. It seals the concrete so the clear does not soak in and go patchy, and it gives the metallic its depth; the pigment looks like it is floating over black.
- Mix the P-015 kit as packaged with the wand on a drill for 3 minutes.
- Cut in the edges with the chip brush, then roll the floor in an even coat. It is a water-based primer, so it goes on thin. One 2 gal kit covers a bay.
- Look across the floor against the light. Every bit of gray concrete should be covered. Touch up any thin spots while it is wet.
- Let it dry until it is hard and not tacky anywhere, usually a few hours in a warm garage. Start early so the metallic coat goes on the same afternoon. If you would rather split the days, the ground coat can sit overnight; past 48 hours, scuff it lightly and vacuum before the metallic coat.
Day one, afternoon: the metallic coat
Mix the pigment in properly
- Pour the 12 oz of metallic pigment into Part A of the C-671 and mix it with the wand until there are no streaks or clumps. Split it in proportion between the 3 gal and 0.75 gal kits, or mix the pigment into the Part A of both and keep the ratio the same.
- Add Part B and mix for 3 minutes, scraping the sides and bottom. C-671 is a 2:1 mix and the kit is packaged in that ratio, so use the whole can of each part.
- Pour it out of the bucket right away. A full bucket of mixed epoxy heats up and sets much faster than it does on the floor. You have about 30 to 40 minutes of working time on the floor at 70°F.
Lay it down
- Cut in a band along the walls with the chip brush.
- Pour the mixed epoxy in ribbons across the floor, starting at the back wall. Pour heavier than you would for a solid color floor: the target is 16 to 18 mils, roughly two to three times a normal base coat.
- Spread with the notched squeegee to an even depth, then back-roll in one direction to level it. Put on the spiked shoes before stepping in.
- Keep a wet edge. Pour and spread the next batch against the last one before it starts to set.
Make the pattern
Once a section is spread and leveled, you have 10 to 20 minutes to work the pattern before the epoxy stops moving.
- Roll pattern. Go back over the section with the roller in loose figure eights or random arcs. The pigment lines up with the roller direction and settles into drifts as it levels. Stop before it gets tacky or you will leave roller texture.
- Pour lines. Save a cup of mixed material from each batch and drizzle it in thin lines across the leveled section. The fresh lines sink in and push the pigment into veins. Do not go back and roll the lines flat.
- Cells. A light mist of denatured alcohol or 91% isopropyl from a spray bottle, held high so it falls as a fine mist, opens round cells in the surface. Use it sparingly and only on a leveled section. Try it on a scrap board the day before so you know what the spray does.
- Leave it alone. After the first few minutes the floor keeps changing on its own as the pigment flows. Fiddling with a coat that has started to set is the most common way to spoil a metallic floor.
Work the whole floor as one piece. If two people are rolling, agree on the pattern and the direction before you start so the halves match.
Day two: the topcoat
- Check the metallic coat is hard, with no tack. Look across it for dust nibs and shave any off with a razor blade held flat.
- Mix the T-521 polyurethane and roll it from a tray, thin and even, 3 to 5 mils wet. Do not pour it on the floor.
- Roll in one direction with a light touch. The clear polyurethane is what you will walk on, and it is the UV protection: bare epoxy ambers in sunlight.
- For a floor that gets wet, stir anti-slip grit into the topcoat. A glossy metallic floor is slick when wet.
The Starter kit has no topcoat. The clear epoxy is the wear surface and it will scratch and amber sooner. If the floor sees sunlight through a door or window, use a Pro kit.
Cure
- Walk on it on day 3.
- Park on it on day 4 to 7, the long end in a cold garage.
- Keep it out of direct sun and away from dragging anything heavy for two weeks while it hardens fully.
Common metallic epoxy mistakes
- Thin ground coat. Gray concrete showing through the black reads as a dead patch in the finished floor.
- Pigment not fully mixed. Clumps leave dark specks and streaks that will not blend.
- Metallic coat too thin. At 8 or 10 mils the pigment has no room to move and the floor looks flat and painted. Pour heavy.
- Working it too long. Once the epoxy starts to set, every roller pass leaves texture.
- Too much alcohol. It thins and craters the surface. A mist, not a spray.
- Sun on the floor. A patch of sun sets faster and the pattern stops there. Close the door.
- Dust between coats. Vacuum before the metallic coat and before the topcoat.
Kits and prices
| Floor | Garage Pro metallic, with topcoat and tools | Garage Starter metallic, no topcoat |
|---|---|---|
| 1-car, up to 350 sq ft | $909.99 | $624.99 |
| 2-car, up to 700 sq ft | $1,694.99 | $1,194.99 |
| 3-car, up to 1,050 sq ft | $2,494.99 | $1,774.99 |
| 4-car, up to 1,400 sq ft | $3,394.99 | $2,359.99 |
Thirteen metallic colors are on the epoxy floor colors page. Orders over $500 ship free.
How to apply metallic epoxy FAQ
Can you do a metallic epoxy floor yourself?
Yes, with a helper and a practice board. The chemistry is the same as any epoxy floor. The pattern work is where people get into trouble, so read the pattern section twice and try the techniques on a scrap board before the real floor.
How thick should the metallic coat be?
16 to 18 mils. The kit is sized for that: 3.75 gal of clear per 350 sq ft. If you spread it thinner to stretch it, the pattern goes flat.
Do I need the black ground coat?
Yes. Without it the clear soaks into the concrete unevenly and the pigment has no dark base to show against. Black is standard; it is what makes the metallic colors look deep.
Can I mix two metallic colors?
Yes. Mix each color in its own batch and pour them next to each other, or drizzle lines of the second color into the first. Order a second pigment from the metallic pigment page.
Why does my floor look different from the photo?
Because the pigment flowed differently on your slab. Same color, your own pattern. That is the nature of the finish.
How do I clean and keep a metallic floor glossy?
Dust mop, then a neutral cleaner and water. No abrasive pads. Details in how to clean an epoxy floor.
Metallic floors are the ones we most want to talk through before you mix. Every order includes a free 20-minute consultation. Call (877) 703-7699. If we miss you, we call back within an hour.